Virtual environment: Difference between revisions
Jump to navigation
Jump to search
m Added OpenVPN client configuration generations instructions |
mNo edit summary |
||
| Line 49: | Line 49: | ||
</graphviz> | </graphviz> | ||
=== OpenVPN Client configuration === | ===OpenVPN Client configuration=== | ||
On the <code>routertestar.dsic.upv.es</code> and <code>routertestaq.dsic.upv.es</code> an OpenVPN server is installed. Users can connect to one of the routers via OpenVPN. A user certificate needs to be created and added to an OpenVPN client configuration. To create a OpenVPN client configuration please follow the following steps: | On the <code>routertestar.dsic.upv.es</code> and <code>routertestaq.dsic.upv.es</code> an OpenVPN server is installed. Users can connect to one of the routers via OpenVPN. A user certificate needs to be created and added to an OpenVPN client configuration. To create a OpenVPN client configuration please follow the following steps: | ||
<br /> | <br /> | ||
# Log into routertestar.dsic.upv.es | #Log into <code>routertestar.dsic.upv.es</code> | ||
# Become root | #Become <code>root</code> user | ||
# Read the OpenVPN CA password in /root/testar-ca-key-password.txt | #Read the OpenVPN CA password in <code>/root/testar-ca-key-password.txt</code> | ||
# Run the following command: <code>openvpn-users.sh</code> | #Run the following command: <code>openvpn-users.sh</code> | ||
# Follow the instructions of the script and give the CA password when asked. 2 OpenVPN configuration files will be created and the certificates will be distibuted to the 2 testar routers | #Follow the instructions of the script and give the CA password when asked. 2 OpenVPN configuration files will be created and the certificates will be distibuted to the 2 testar routers | ||
# Copy the generated OpenVPN configurations files from the /root/ directory to your own computer with scp/winscp | #Copy the generated OpenVPN configurations files from the /root/ directory to your own computer with scp/winscp | ||
# Distribute the OpenVPN configuration files to the end user, so they can import this in their OpenVPN client. | #Distribute the OpenVPN configuration files to the end user, so they can import this in their OpenVPN client. | ||
Revision as of 22:25, 9 October 2019
Virtual Environment @ UPV
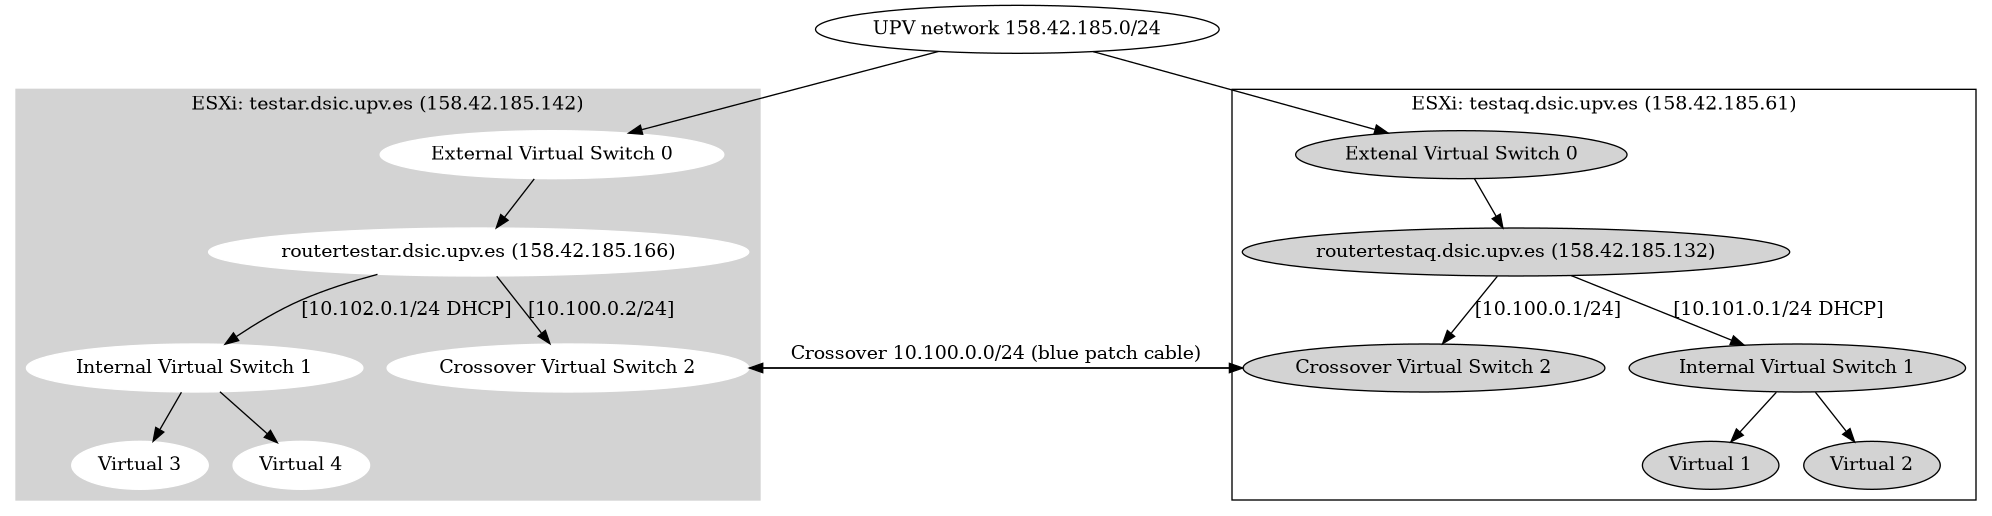
OpenVPN Client configuration
On the routertestar.dsic.upv.es and routertestaq.dsic.upv.es an OpenVPN server is installed. Users can connect to one of the routers via OpenVPN. A user certificate needs to be created and added to an OpenVPN client configuration. To create a OpenVPN client configuration please follow the following steps:
- Log into
routertestar.dsic.upv.es - Become
rootuser - Read the OpenVPN CA password in
/root/testar-ca-key-password.txt - Run the following command:
openvpn-users.sh - Follow the instructions of the script and give the CA password when asked. 2 OpenVPN configuration files will be created and the certificates will be distibuted to the 2 testar routers
- Copy the generated OpenVPN configurations files from the /root/ directory to your own computer with scp/winscp
- Distribute the OpenVPN configuration files to the end user, so they can import this in their OpenVPN client.